10) test 테이블에 값 insert
– 전통적인 방법으로 직접 mysql 접속하여 insert 해도 되지만
“Tinker” 를 사용 해도 된다.

– “Tinker” 이용 하여 테이블에 값을 INSERT 아래와 같이 한다.
10 -1 ) 컨트롤 파일 만들때 만들어진 모델(Model) 파일을 열어서 편집한다.
~/www/app$ vi Test.php
<?php
namespaceApp;
use Illuminate\Database\Eloquent\Model;
classTestextendsModel
{
protected$table = ‘test’;
protected$fillable = [‘subject’,’contents’];
}
10-2) 터미널 에서 “Tinker” 를 실행하여 데이터를 아래와 같이 insert 한다.
~/www$ php artisan tinker
Psy Shell v0.9.12 (PHP 7.2.19-0ubuntu0.18.04.2 — cli) by Justin Hileman
>>> App\Test::create([
‘subject’ => ‘subject 1’,
‘contents’ => ‘contents 1’
]);
=> App\Test {#3003
subject: “subject 1”,
contents: “contents 1”,
updated_at: “2019-12-24 02:19:02”,
created_at: “2019-12-24 02:19:02”,
id: 1,
}
>>> App\Test::create([
‘subject’ => ‘subject 2’,
‘contents’ => ‘contents 2’
]);
=> App\Test {#3015
subject: “subject 2”,
contents: “contents 2”,
updated_at: “2019-12-24 02:19:20”,
created_at: “2019-12-24 02:19:20”,
id: 2,
}
>>> App\Test::create([
‘subject’ => ‘subject 3’,
‘contents’ => ‘contents 3’
]);
=> App\Test {#3004
subject: “subject 3”,
contents: “contents 3”,
updated_at: “2019-12-24 02:19:33”,
created_at: “2019-12-24 02:19:33”,
id: 3,
}
>>> App\Test::create([
‘subject’ => ‘subject 4’,
=> App\Test {#3014tents 4′
subject: “subject 4”,
contents: “contents 4”,
updated_at: “2019-12-24 02:19:46”,
created_at: “2019-12-24 02:19:46”,
id: 4,
}
>>>
Tinker “터미널” 종료시에는 “Ctrl + C” 해서 빠져나와도 됩니다.
10-3) test 테이블에 등록된 내용 확인 아래
mysql> select * from test ;
+—-+———–+————+———————+———————+
| id | subject | contents | created_at | updated_at |
+—-+———–+————+———————+———————+
| 1 | subject 1 | contents 1 | 2019-12-24 02:19:02 | 2019-12-24 02:19:02 |
| 2 | subject 2 | contents 2 | 2019-12-24 02:19:20 | 2019-12-24 02:19:20 |
| 3 | subject 3 | contents 3 | 2019-12-24 02:19:33 | 2019-12-24 02:19:33 |
| 4 | subject 4 | contents 4 | 2019-12-24 02:19:46 | 2019-12-24 02:19:46 |
+—-+———–+————+———————+———————+
4 rows in set (0.00 sec)
11) 웹 브라우져 화면에 출력하기
11-1) 컨트롤 파일 편집
~/www/app/Http/Controllers$ vi TestController.php
<?php
namespaceApp\Http\Controllers;
use App\Test;
use Illuminate\Http\Request;
classTestControllerextendsController
{
/**
* Display a listing of the resource.
*
* @return \Illuminate\Http\Response
*/
publicfunctionindex()
{
// return view(‘test.index’);
$items = \App\Test::all();
// return $items;
returnview(‘test.index’,compact(‘items’));
}
11-2) 뷰(view) 파일 편집 2
~/www/resources/views/test$ vi index.blade.php
<!DOCTYPEhtml><html>
<head>
<title>TEST PAGE</title>
</head>
<body>
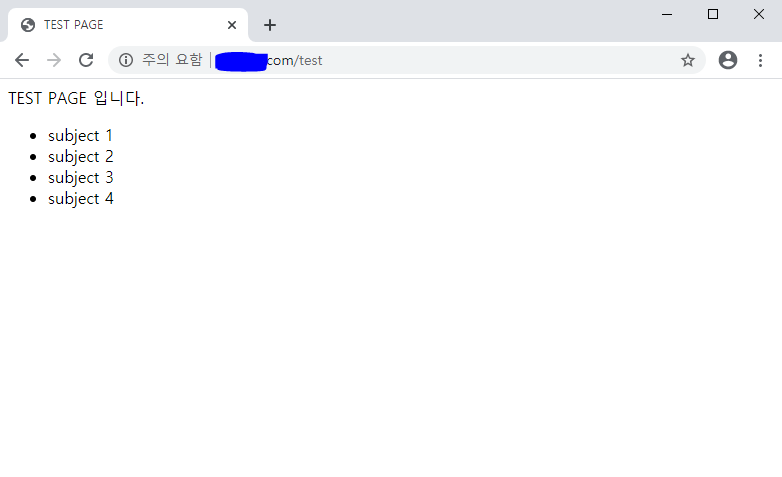
TEST PAGE 입니다. <br>
<ul>
@foreach($items as $column)
<li>{{ $column->subject }}</li>
@endforeach
</ul>
</body>
</html>
12) 결과 확인 ( http://도메인/test )